Friday 20 December 2013

A few things I made recently

I'm building up up quite a stock of unglazed pieces at the moment. Some of them I'll finish off in the electric kiln but others are better suited to being glaze fired in reduction, which for me means firing out-doors. It will probably be spring before I'm able to fire with wood again, and it's quite frustrating having to wait so long to complete work.

Here are just a few of the pieces I've been making over the last few weeks. Many are experimental, trying out new techniques and shapes..it always amazes me how certain forms can be quite similar and yet one piece often stands out and works better than the others..it can be difficult to put your finger on the reason why..

2.5 ins tall

Tea caddy, 4 ins tall

4.5 ins long

4.5 ins tall
Vases, tallest 10 ins

Carved tea caddy, 5 ins tall

Carved tea bowl 4 ins tall
Thanks for reading!

Sunday 1 December 2013

Carving sake cups today

I threw some sake cups a few days ago and this afternoon I've been finishing off the feet. When I've thrown off the hump in the past I often found it quite tricky to trim them on the wheel, either because they were cut off unevenly from the hump, or I distorted the shape of the bowl a little so they wouldn't sit flat on the wheel head.  I rather like the random unevenness and roughness of the base, so I decided to trim these by hand and was happier with some of the results.


Of course, carving the bases is more difficult and less predictable so the failure rate tends to be higher. But on the plus side, throwing off the hump is quite efficient so I can throw alot of these little bowls in one sitting.

Saturday 23 November 2013

Some nice glazes and interesting discoveries

The latest firing of the electric kiln was not entirely successful, but I was very happy with some of the pots which came out. The Nuka glazes in particular worked very well indeed, having been put over a new slip formula which has reduced the fluxing slightly and retained more of the unmelted silica..that is to say they are a bit more white and opaque than before.


Close-up of Nuka glaze

I have to be careful with this glaze though..when applied thick it does like to run down the pot, and in some cases drips off it! In future I need to leave at least half an inch of space at the bottom to allow for this.

I also tried a new glaze combination; a crackle shino over matte calcium glaze applied to a sake cup. It was fired in a sealed saggar with heavy reduction from charcoal, and the result was very pleasing:


The last couple of firings I've used an external pyrometer as well as cones, and I've found this very useful in monitoring the rate of temperature increase. The pyro' seems reasonably accurate, so I can see almost exactly what temperature the pots next to the thermocouple have been fired too. This carved espresso cup with oribe glaze was fired to 1275 degrees C with a half-hour soak. I noticed that the oribe pot placed on the higher, hotter shelf was slightly pinholed, leading me to the conclusion that I may have been slightly over-firing the oribe in the past by going to 1285 or higher.


Alongside these pieces I also fired a number of test glazes, mainly with high alumina slips and matte ash glazes. All the glazes contained copper oxide and this combined with metal oxides in the slips to create really dark colours..a little disappointing as I was hoping to achieve some green hues as well.


Nonetheless, the results were extremely interesting. The matte ash glaze has made the underlying slip crack and crawl in places, which is an effect I'm trying to achieve. It also cracked and peeled in an interesting way over the Valentines black clay..the glaze is very dark brown where thin and and a paler brown where it's pooled in the nooks and crannies:


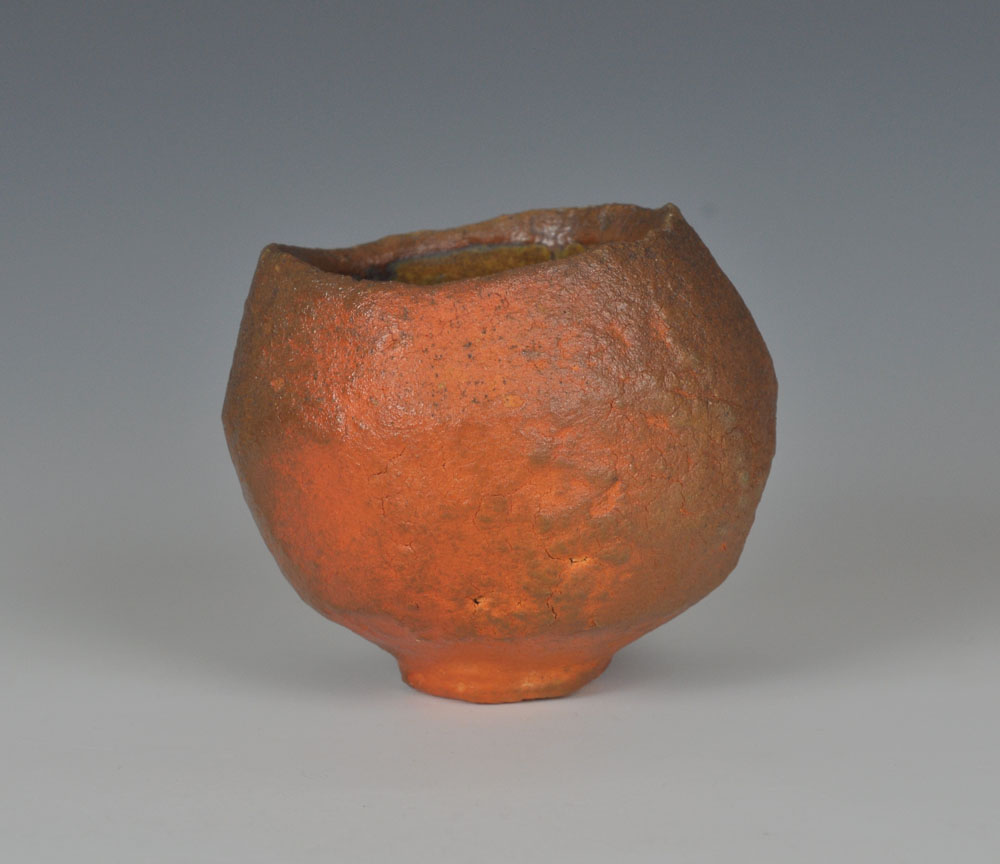
I groaned a little when pulling this vase from the kiln, thinking it was way too dark, and a blob of Nuka had dropped from a pot from the shelf above and landed squarely in the middle! But having lived with it for a few days, it's really growing on me..it has a strong, individual character.

Finally, I layered two different matte ash glazes (containing black copper oxide) and a dolomite glaze on this piece..it actually has five layers of slips and glazes in total! The results don't look terribly inspiring in the photo but the surface tells me a great deal about how the glazes and slips are interacting with each other. The most interesting thing here is the way the copper dolomite glaze (the paler blobs) is quite matte over one glaze, but more glossy and green over another..where thin it's also darker, picking up colours from the base slips:


The more highly fluxed ash glaze has sealed the base slip (the black patches), whereas the high clay matte glaze has made it crack and split like dried mud. The dolomite glaze definitely has potential, I really like the variety of colours and textures it produces.

Thanks for reading!


Friday 8 November 2013

Cold and damp November

The other day it was Guy Fawkes night, the 5th of November, and the weather brought back strong memories of childhood, when it was often misty and freezing cold and the smoke from hundreds of bonfires would create a thick fog across the town. The combined smells of wood smoke and exploded gunpowder are extraordinarily evocative. Seems amazing now that in those days we kids were allowed to light our own rockets in milk bottles, throw Bangers around and stand so close to the bonfire that your face would hurt.

Not the best weather for making pots in a studio with no central heating, but I'm trying to make the best of it. If the clay is still too wet for throwing large pots, I focus on making small pieces like these bud vases.


I gain a great deal of satisfaction from throwing these rounded forms off the hump. The extra height makes it easier to watch the whole form emerging, and they are often finished when they come off the wheel..that is to say, the bottoms don't need an extra stage of trimming.

I also did a bisque firing yesterday, which warmed things up a little..and these tea caddies are now ready for glazing.


It's not easy getting lids to fit exactly, and sometimes they get damaged in the firing, or they can warp. So I'm building up a stock of spare lids which are of a similar size but with slight variations in diameter..it may be possible to match them to pots, if there's a problem with the original one.

Success with the dry glaze in the last wood firing (2nd photo down in the last post) has encouraged me to start exploring other combinations of matte slips and glazes, adding calcined alumina and/or alumina hydrate into the mix. The pieces below are just preliminary glaze tests, fired in the electric kiln, and alot more experimentation will be needed to work out exactly how the slips and glazes are behaving and interacting. The slips here had several metal oxides added, and the glaze contained copper oxide, so the colours came out pretty dark.


Ideally I would like the glaze layer to crawl and take on the appearance of lichen on a rock, in the same way that these previous test pieces have done:


These tests were fired in both electric and wood kilns to cone 9/10. The ash glaze has crawled in a rather beautiful way, but the glaze was applied over refractory slip which had already been fired to cone 10.  So I need to find a way to reproduce this effect without having to high fire twice, which would be even more uneconomical than it already is!

Thanks for reading.

Wednesday 16 October 2013

Pots from the October wood firing

As promised, here's a selection of my pieces pulled from the Manor Stokes kiln on 8th October. Overall it was an excellent firing with good levels of reduction throughout the kiln, even at the top which is often fairly oxidized. I was delighted with most of the pots, especially those placed near the firebox which were beautifully coloured by the ash and flame.

Vase, shino glaze

Vase, matte ash glazes

Vase, shino glaze

Iga style vase, 8 ins tall
With the Iga style vase above, I tried adding extra wood ash by mixing it with plain flour and water and applying the paste to the bisqued surface. The plain flour is used only to make the ash stick to the pot..the idea being that it burns out completely in the firing. Due to the very heavy reduction in the mouth of the firebox, the flour hasn't completely burned out, and the ash didn't get quite hot enough to fully melt, hence the very crusty surface which is rather crumbly in places. Although I like the look of this vase, it will probably need re-firing at some point.


Guinomi

Guinomi, carbon-trap shino

Vase, black slip decoration

Tea bowl, celadon glaze

Lidded container

Celadon vase

Lidded container
Vase with shino glaze pours

Small textured vase

Carved vase
Close-up of texture, carved vase

Underside of carved vase
Carved vase, 12 ins tall
Incidentally, I managed to bisque the very tall bottle vase in my electric kiln yesterday! The height of the kiln was extended with lightweight bricks and brought in pyramid style, round the top of the vase.


A few layers of kiln fibre for the roof and it was ready to fire. It took a little longer than a normal bisque but worked fine, I may even try this method for a glaze firing.. I think it could even work for a stoneware firing to cone 7...cone 10 might be pushing it, and no doubt there would be some problems with uneven temperature.

Thanks for reading :)

Mystery of poor photos solved!

I found out the reason for my photos looking awful in Blogger. It's down to the new Google+ auto-enhance feature, which is supposed to improve your photos but actually makes them look much, much worse.

The full explanation can be found here: http://www.peekandponder.com/2013/09/how-to-fix-poor-image-quality-on-blogger.html

Simple fix can be found in the Google+ settings where you can switch off the auto-enhance option and revert photos which have already been "enhanced"...you can also set an option to say you want your photos uploaded at full size. Glad I found this now, as I was seriously considering stopping using Blogger altogether.

Thursday 10 October 2013

A wood fired tea caddy

The wood firing at Manor Stokes was a success, and we achieved a good level of reduction throughout the kiln. I will show more pictures of the results soon, but for now, here is my finished tea caddy (the textured one I fired first in a small gas kiln) :


I sprinkled some extra wood ash on top, and just as in the gas kiln, it didn't melt fully! Actually, the kiln was a little cooler at the bottom than normal, and I'm not sure why..possibly because we were reducing the whole kiln so heavily. But it has evened up the colour on the lid and created an interesting, crusty surface, so overall I'm very happy with it. 

Thursday 3 October 2013

Back to sculpture

Making the large figurative vase the other day gave me some inspiration and ideas for sculpture. It is quite some time since I made any sculptural work .. one or two didn't work out but these are the keepers for now:

Length 8in

Height, 8 ins

Height, 6 ins
"King for a day". Bisqued clay, 6 ins tall.

I'm not sure how these rough textures will look fired..the problem is always how to achieve the right colour without adding glazes which may adversely affect the texture. Last week I "discovered" a new way to apply ash to bisqued clay; by mixing raw, sieved ash about 55/45 with plain flour and water to make a kind of gluey paste. This can be poured inside forms or brushed on the outside and once dry, the flour-ash mixture forms quite a hard, durable surface:

Pot with wood ash- flour coating

The other day I fired this mixture to cone 10 on a couple of test pieces in the electric kiln and it worked reasonably well, although the colours were quite pale and muted, being an oxidation firing. This weekend I am firing the wood kiln with the Manor Stokes team and will also test it on a few pots. I'm excited to see how they will turn out.

Very disappointed with the way Blogger has uploaded these B&W jpeg images..they are completely different to the originals; over-exposed and the background has a kind of interference effect going on! They look much, much better in flickr. It's as though the exposure adjustments I made in Photoshop have been stripped out of the images. This has never happened before, and I wonder if Blogger is now compressing images to save on storage space..hmmmm.

Thanks for reading.